第一步 apply light pencil stroke to give basic design and position on the page.
(用铅笔在纸上轻轻地画出基本设计和位置。)

第二步 refining the shape of the object.
(推敲物体的形状。)
.jpg)
第三步 apply heavier pencil stroke when design is confirmed. Then repeat the step 1 for other views.
(当设计确定时,加粗线条。在其它视角上重复步骤一。)
.jpg) 第四步 lay in more design content...
第四步 lay in more design content...(增加更多设计内容...)
.jpg) 第五步 a little guy for showing how to use the object.
第五步 a little guy for showing how to use the object. (画一个人展示如何使用这个产品。)
.jpg) 第六步 give shadows to make the drawn object jump out the page.
第六步 give shadows to make the drawn object jump out the page. (加上阴影让它跳出纸面,即更有立体感。)
.jpg) 第七步 apply heavy line weight to trace the light sketch.
第七步 apply heavy line weight to trace the light sketch. (加重线条来描绘草图。)
.jpg) 第八步 more details...
第八步 more details...(更多细节...)
.jpg) 第九步 more details...
第九步 more details...
(更多细节...)
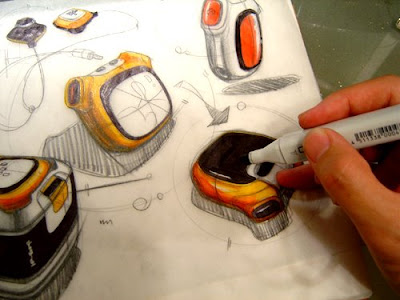
.jpg) 第十步 marker color in on the back of the tracing paper.
第十步 marker color in on the back of the tracing paper.
(在硫酸纸的背面用马克笔上色)
.jpg) 第十一步 Keep fill in color form the back of the tracing paper.
第十一步 Keep fill in color form the back of the tracing paper.
(继续在纸的背面上其它颜色。)
.jpg) 第十二步 Black and white prismacolor pencils give dark cores and high light on objects.
第十二步 Black and white prismacolor pencils give dark cores and high light on objects.
(用黑色和白色的霹雳马彩铅在物体上画出暗部和高光。)
.jpg) 第十三步 add call-out to explain the design intension... Sign and then finish.
第十三步 add call-out to explain the design intension... Sign and then finish.
(加注解,解释设计意图...签名,完成。)
.jpg)
after scenes(追加):
P1_ marker color in on the back of the tracing paper.
(用麦克笔在纸的背面上色。)
.jpg) P2_ keep using makers on the back.
P2_ keep using makers on the back.
(继续用马克笔在纸的背面上色。)
.jpg) P3_ put a mesh underneath the page for speaker texture.
P3_ put a mesh underneath the page for speaker texture.
(把网眼垫在纸上画出扬声器的质感。)
.jpg) P4_ hold pencil side ways to apply dark cores.
P4_ hold pencil side ways to apply dark cores.
(侧握笔来画暗部。)
.jpg) P5_ add shadows on objects.
P5_ add shadows on objects.
(加影子在物体上。)
.jpg) P6_ white pencil to give high light and part lines.
P6_ white pencil to give high light and part lines.
(用白色的彩铅加上高光和__线。)
.jpg) P7_ Material and tools. always remember to keep the pencil sharp.
P7_ Material and tools. always remember to keep the pencil sharp.
(材料和工具。记得经常削尖铅笔。)
.jpg)
翻译的不是太好,但至少没有网络上的那个繁体字版本翻译的那么雷人。。。呵呵!
据me了解,工具由左至右应该是:
松下KP-4A电动卷笔刀,三福Prismacolor彩铅(白色和黑色),Copic马克笔。
.jpg) 第九步 more details...
第九步 more details...(更多细节...)
.jpg) 第十步 marker color in on the back of the tracing paper.
第十步 marker color in on the back of the tracing paper. (在硫酸纸的背面用马克笔上色)
.jpg) 第十一步 Keep fill in color form the back of the tracing paper.
第十一步 Keep fill in color form the back of the tracing paper. (继续在纸的背面上其它颜色。)
.jpg) 第十二步 Black and white prismacolor pencils give dark cores and high light on objects.
第十二步 Black and white prismacolor pencils give dark cores and high light on objects. (用黑色和白色的霹雳马彩铅在物体上画出暗部和高光。)
.jpg) 第十三步 add call-out to explain the design intension... Sign and then finish.
第十三步 add call-out to explain the design intension... Sign and then finish. (加注解,解释设计意图...签名,完成。)
.jpg)
after scenes(追加):
P1_ marker color in on the back of the tracing paper.
(用麦克笔在纸的背面上色。)
.jpg) P2_ keep using makers on the back.
P2_ keep using makers on the back. (继续用马克笔在纸的背面上色。)
.jpg) P3_ put a mesh underneath the page for speaker texture.
P3_ put a mesh underneath the page for speaker texture. (把网眼垫在纸上画出扬声器的质感。)
.jpg) P4_ hold pencil side ways to apply dark cores.
P4_ hold pencil side ways to apply dark cores. (侧握笔来画暗部。)
.jpg) P5_ add shadows on objects.
P5_ add shadows on objects. (加影子在物体上。)
.jpg) P6_ white pencil to give high light and part lines.
P6_ white pencil to give high light and part lines. (用白色的彩铅加上高光和__线。)
.jpg) P7_ Material and tools. always remember to keep the pencil sharp.
P7_ Material and tools. always remember to keep the pencil sharp. (材料和工具。记得经常削尖铅笔。)
.jpg)
翻译的不是太好,但至少没有网络上的那个繁体字版本翻译的那么雷人。。。呵呵!
据me了解,工具由左至右应该是:
松下KP-4A电动卷笔刀,三福Prismacolor彩铅(白色和黑色),Copic马克笔。
点击小图可以看大图。
回复删除